カーネルの入手
本来であれば、自分でscstに対応したカーネルを作らないといけないのですが、すでにビルド済みの物が配布されているのでそれを使わせて頂きます。
/etc/apt/sources.listに以下を追加します。
vi /etc/apt/sources.list
deb http://www.motschke.de/debian/ stable main
---略---
追記が終わったらレポジトリのアップデートをします
root@ibhack:~# apt-get update
Hit http://ftp.jp.debian.org testing InRelease
Hit http://ftp.jp.debian.org testing/main Sources/DiffIndex
Hit http://ftp.jp.debian.org testing/main amd64 Packages/DiffIndex
Hit http://ftp.jp.debian.org testing/main Translation-en/DiffIndex
Ign http://www.motschke.de stable InRelease
Ign http://www.motschke.de stable Release.gpg
Get:1 http://www.motschke.de stable Release [96 B]
Get:2 http://www.motschke.de stable/main amd64 Packages [5,935 B]
Ign http://www.motschke.de stable/main Translation-en_US
Ign http://www.motschke.de stable/main Translation-en
Fetched 6,031 B in 11s (536 B/s)
Reading package lists... Done
または、ここから必要なものを取ってきてdpkg -iします。
http://www.motschke.de/debian/packages/stable/
kernel/linux-image-3.2.21-scst-2.2.x-amd64_1.1_amd64.deb
SCST/scst-modules-3.2.21-scst-2.2.x-amd64_3.2.21-scst-2.2.x-amd64-1.0_amd64.deb
SCST/iscsi-scst_2.2-1.1_amd64.deb
これらが必要です。
これでapt-get install をすればいいのですが、scstを入れるとscst組み込みカーネルになるので、自分でカスタマイズしてカーネルを作っている人は注意です。まあそんなことをしてる人はわざわざこんなところ見ないと思いますが…。
root@ibhack:~# apt-get install iscsi-scst
---中略---
Setting up scst-modules-3.2.21-scst-2.2.x-amd64 (3.2.21-scst-2.2.x-amd64-1.0) ...
すると、ごりごりとinitramfs等のアップデートが行われるので、再起動してscst組み込み済みカーネルになっているか確認します。
root@ibhack:~# uname -r
3.2.21-scst-2.2.x-amd64
SCSTの設定
scst組み込み済みカーネルでマシンが無事に上がってきたら、カーネルに組み込まれたscstドライバをロードします。一応、ファイルがあるか確認します。
root@ibhack:~# modinfo scst_vdisk
filename: /lib/modules/3.2.21-scst-2.2.x-amd64/extra/dev_handlers/scst_vdisk.ko
version: 2.2.1-pre
description: SCSI disk (type 0) and CDROM (type 5) dev handler for SCST using files on file systems or block devices
license: GPL
author: Vladislav Bolkhovitin & Leonid Stoljar
srcversion: B0EEADC040B8E1E80F57A67
depends: scst,libcrc32c
vermagic: 3.2.21-scst-2.2.x-amd64 SMP mod_unload modversions
parm: num_threads:vdisk threads count (int)
ファイルがあることを確認したらドライバをロードします。
root@ibhack:~# modprobe scst
root@ibhack:~# modprobe scst_vdisk
root@ibhack:~# modprobe ib_srp
root@ibhack:~# modprobe ib_srpt
そうしたらscstadminと言うコマンドを実行するのですが、何故か自分の環境だとSCST.pmがないと言われ実行できませんでした。
root@ibhack:~# scstadmin
Can't locate SCST/SCST.pm in @INC (@INC contains: /etc/perl /usr/local/lib/perl/5.14.2 /usr/local/share/perl/5.14.2 /usr/lib/perl5 /usr/share/perl5 /usr/lib/perl/5.14 /usr/share/perl/5.14 /usr/local/lib/site_perl .) at /usr/sbin/scstadmin line 238.
BEGIN failed--compilation aborted at /usr/sbin/scstadmin line 238.
調べてみると、perlのバージョンが5.14なのに対してSCST.pmが入ってるのが5.10のディレクトリになっているのが原因でした。
root@ibhack:~# find /usr/ -name "*SCST*"
/usr/local/lib/perl/5.10.1/auto/SCST-SCST
/usr/local/share/man/man3/SCST::SCST.3pm.gz
/usr/local/share/perl/5.10.1/SCST
/usr/local/share/perl/5.10.1/SCST/SCST.pm
今回はSCST以下があればいいので、ディレクトリにシンボルリンクを張るか、export PERL5LIBをしてライブラリパスを追加します。5.14でも5.10のライブラリは動きました。これでエラーメッセージが出なければOKです。多分。
root@ibhack:~# ln -s /usr/local/share/perl/5.10.1/SCST/ /usr/lib/perl/5.14/SCST
(または)#export PERL5LIB=/usr/local/share/perl/5.10.1/
root@ibhack:~# scstadmin
Collecting current configuration: done.
No valid operations specified.
SCSTadminの初期設定
scstadminを使ってLUNを作っていくわけですが、慣れるまで少々分かりづらいです。今回は、まずramfsでメモリに10Gの領域を確保して、そこに10G分DDをして、fileioなイメージを作ります。
root@ibhack:~# mount -t ramfs -o size=10G ramfs /a
root@ibhack:~# dd if=/dev/zero of=/a/10G.img bs=1M count=10000
次に、SCSTのドライバにib_srptが登録されているか確認します。無ければ、modprobe ib_srptしてください。
root@ibhack:~# scstadmin -list_driver
Collecting current configuration: done.
Driver
-------
ib_srpt
All done.
次に、scst_vdiskがscstadmからみえているか確認します。無ければ、modprobe scst_vdiskしてください。
root@ibhack:~# scstadmin -list_handler
Collecting current configuration: done.
Handler
-------------
vdisk_fileio
vdisk_blockio
vdisk_nullio
vcdrom
All done.
ramと言う名前のデバイスを作りfileioでアクセスするようにしています。
root@ibhack:/ib# scstadmin -open_dev ram -handler vdisk_fileio -attributes filename=/a/10G.img
Collecting current configuration: done.
-> Making requested changes.
-> Opening device 'ram' using handler 'vdisk_fileio': done.
-> Done.
All done.
デバイスが追加されたか確認します。
root@ibhack:/ib# scstadmin -list_devi
Collecting current configuration: done.
Handler Device
---------------------
vdisk_nullio -
vdisk_fileio ram
vdisk_blockio -
vcdrom -
All done.
現在あるターゲットポータルを確認します。
root@ibhack:/ib# scstadmin -list_targ
Collecting current configuration: done.
Driver Target
------------------------
ib_srpt ib_srpt_target_0
All done.
このターゲットにibhack_srpという名前のグループを作ります。
root@ibhack:/ib# scstadmin -add_group ibhack_srp -driver ib_srpt -target ib_srpt_target_0
Collecting current configuration: done.
-> Making requested changes.
-> Adding new group 'ibhack_srp' to driver/target 'ib_srpt/ib_srpt_target_0': done.
-> Done.
All done.
Lun0にib_srpt_target_0ポータルのibhack_srpグループのramと言うデバイスを関連づけ、readonly=0でマウントします。
root@ibhack:/ib# scstadmin -add_lun 0 -driver ib_srpt -target ib_srpt_target_0 -group ibhack_srp -device ram -attributes read_only=0
Collecting current configuration: done.
-> Making requested changes.
-> Adding device 'ram' at LUN 0 to driver/target/group 'ib_srpt/ib_srpt_target_0/ibhack_srp': done.
-> Driver/target is not a fibre channel target, ignoring.
-> Done.
All done.
こうすると、/var/log/systemまたはdmesgにデバイスをアタッチしたよ!と言うメッセージが来ます。(貼り付けたメッセージはdmesg)
[17715.372975] dev_vdisk: Registering virtual vdisk_fileio device ram
[17715.372999] dev_vdisk: Attached SCSI target virtual disk ram (file="/a/10G.img", fs=10000MB, bs=512, nblocks=20480000, cyln=10000)
[17715.373053] scst: Attached to virtual device ram (id 2)
[18180.879669] scst: Added device ram to group ibhack_srp (LUN 0, rd_only 0)
Fileioに使うパスなどを間違えていないことを確認したら、ターゲットを有効化します。
root@ibhack:/ib# scstadmin -enable_target ib_srpt_target_0 -driver ib_srpt
Collecting current configuration: done.
-> Making requested changes.
-> Enabling driver/target 'ib_srpt/ib_srpt_target_0': done.
-> Done.
All done.
ここで、tailf (or tail -F)/var/log/systemをした状態でターミナルを開いておき、一旦target側を離れます。
Windows SRP Initiatorの設定
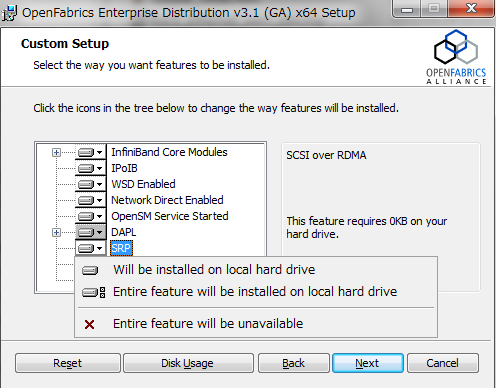
Initiator側として、まずWindows7から接続してみます。OFED For Windowsをここからダウンロードし、インストールするときにSRPパッケージを入れます。
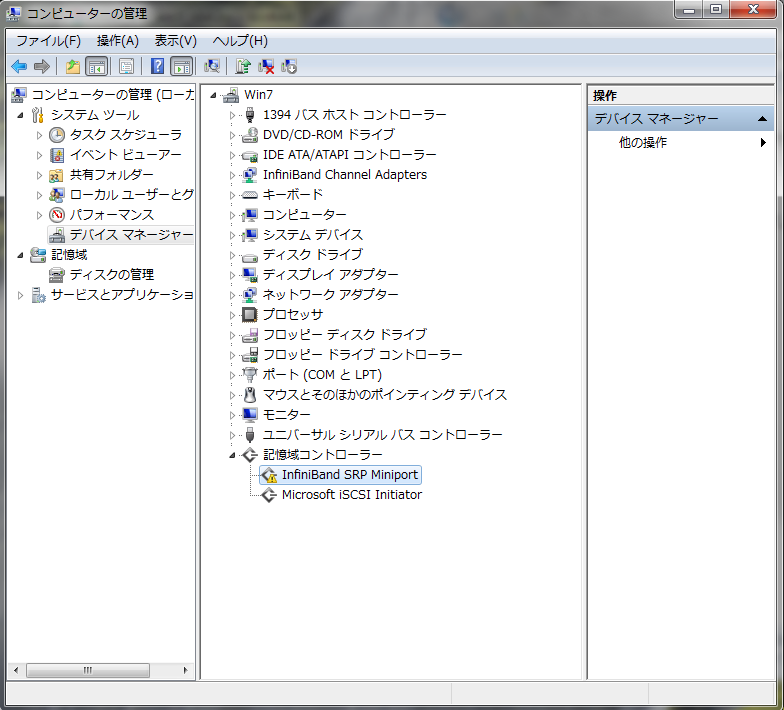
すると、デバイスマネージャにInfiniband SRP miniportというのが追加されます。この段階では!マークがついていますが、これはターゲットにログインできない為についてるものです。!がつく場合は、scstadmin -enable_targetをしていないか、SMが起動していないか、ケーブルが繋がっていないと思われます。原因を特定した後、SRP miniportを無効化して有効にすると再接続しに行きます。
SRP miniportを入れたら、SCSTに戻ります。
SCSTに接続するイニシエーターの追加
SCSTに戻ったら、Miniportドライバを有効にしたタイミングでtailfしているターミナルに何かが流れると思います。よく分からなかったら、Windows側に戻りSRP Miniportドライバを無効にしたり有効にしたりしてみてください。すると、以下のようになります。
Dec 10 14:57:45 ibhack kernel: [28606.571026] ib_srpt: Received SRP_LOGIN_REQ with i_port_id 0x5ad00000bf4d4:0x5ad00000bf3d0, t_port_id 0x5ad00000bf4d4:0x5ad00000bf4d4 and it_iu_len 4148 on port 1 (guid=0xfe80000000000000:0x5ad00000bf4d5)
Dec 10 14:57:45 ibhack kernel: [28606.571898] scst: Using security group "ib_srpt_target_0" for initiator "0x0005ad00000bf4d40005ad00000bf3d0" (target ib_srpt_target_0)
Dec 10 14:57:45 ibhack kernel: [28606.572222] ib_srpt: Received IB MRA event
この、真ん中にある
initiator "0x0005ad00000bf4d40005ad00000bf3d0”
と言うのが、接続しようとしているイニシエーターIDです。これをコピーします。
接続するイニシエーターIDが分かったら、add_initでそれをscstに追加します。
root@ibhack:/ib# scstadmin -add_init 0x0005ad00000bf4d40005ad00000bf3d0 -driver ib_srpt -target ib_srpt_targe
t_0 -group ibhack_srp
Collecting current configuration: done.
-> Making requested changes.
-> Adding new initiator '0x0005ad00000bf4d40005ad00000bf3d0' to driver/target/group 'ib_srpt/ib_srpt_target_0/ibhack_srp': done.
-> Driver/target is not a fibre channel target, ignoring.
-> Done.
All done.
正しいInitIDが追加できると、dmesg(or /var/log/system)にこのように出ます。
[28683.068321] scst: Added name 0x0005ad00000bf4d40005ad00000bf3d0 to group ibhack_srp
[28683.068505] scst: Processing thread ram0_0 (PID 3790) started
[28683.068715] scst: Processing thread ram0_1 (PID 3791) started
[28683.068895] scst: Processing thread ram0_2 (PID 3792) started
[28683.069015] scst: Processing thread ram0_3 (PID 3793) started
[28683.069141] scst: Processing thread ram0_4 (PID 3794) started
[28683.069266] scst: Processing thread ram0_5 (PID 3795) started
[28683.069371] scst: Processing thread ram0_6 (PID 3796) started
[28683.069480] scst: Processing thread ram0_7 (PID 3797) started
root@ibhack:/ib#
正しくスレッドが走ったら、再びWindows側に戻ります。
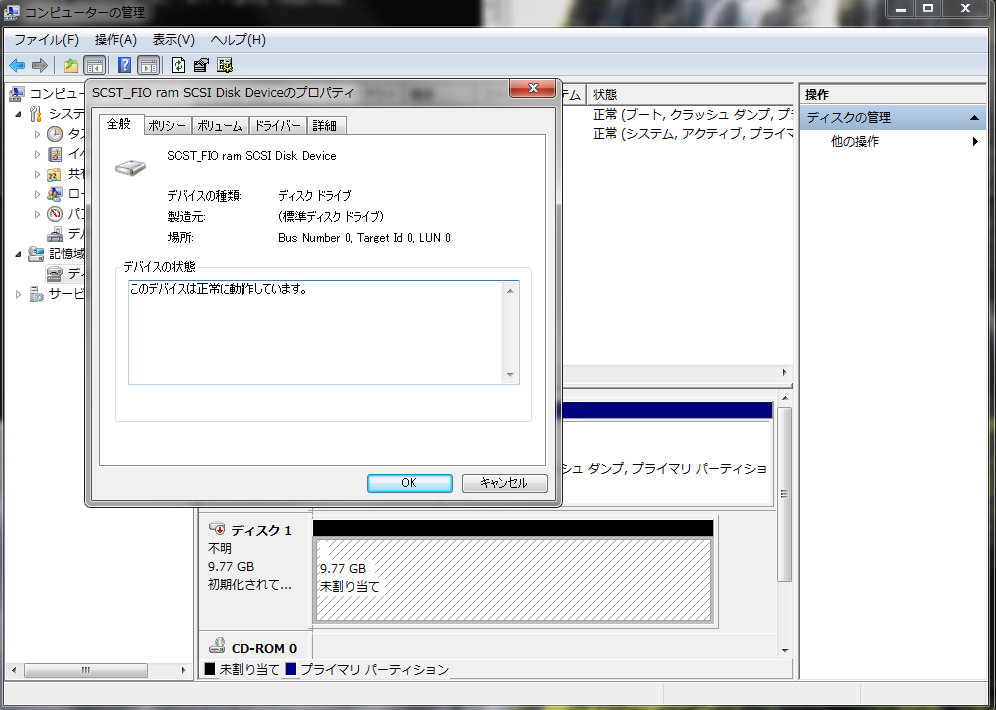
Windowsでディスクの再スキャン
マシンそのものを再起動しても良いですが、コンピューターの管理からディスクの管理→ディスクの再スキャン をすることにより、追加したディスクがみえるようになるはずです。あとはいつも通りのディスクとして扱えるので、煮るなり焼くなりご自由に。
パフォーマンスについて
とりあえず主要ベンチを走らせてみたところ、DDRなInfinihost IIIという古い構成であっても、10Gbit近く出ました。iSCSIでは4-5Gb/sでネックになっていたのに比べ、2倍近く速くなりました。CPU使用率はシーケンシャル読みをしたときの負荷です。
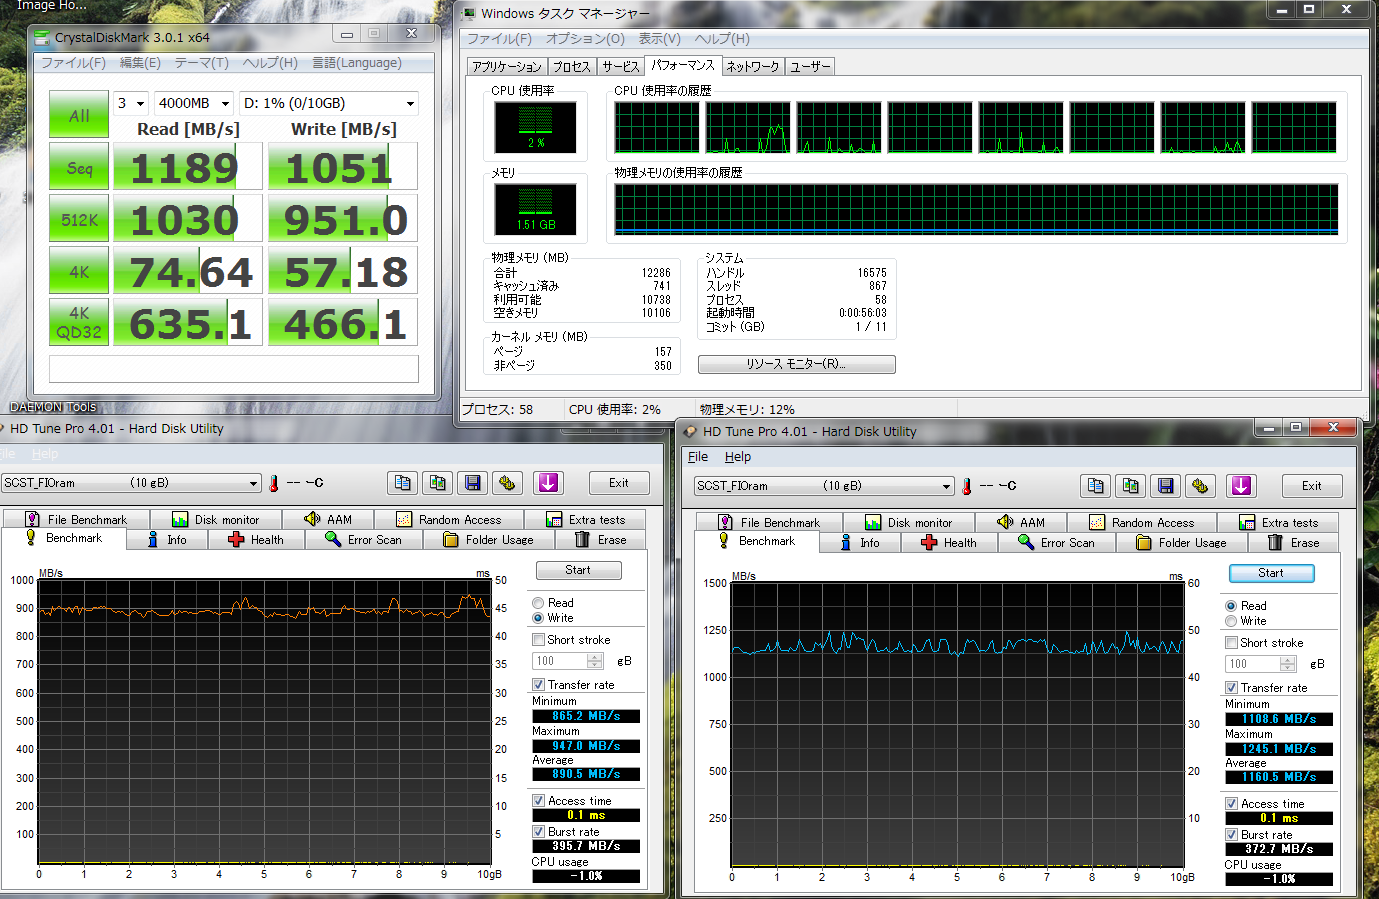
ちなみに、ib_write_bwをscstサーバ側で立ち上げ、Windows側から接続したときのパフォーマンスは最大1500MB/s程度出ていたので、あと2Gb/s程度の余地はありそうです。
------------------------------------------------------------------
RDMA_Write BW Test
Number of qp's running 1
Connection type : RC
Each Qp will post up to 100 messages each time
Inline data is used up to 400 bytes message
local address: LID 0x01, QPN 0x100407, PSN 0x777cc6 RKey 0xe4002a00 VAddr 0x007fe0519e7000
remote address: LID 0x02, QPN 0xd0407, PSN 0xa9d4db, RKey 0x4e002700 VAddr 0x007fcda6d13000
Mtu : 2048
------------------------------------------------------------------
#bytes #iterations BW peak[MB/sec] BW average[MB/sec]
2 5000 2.21 2.21
4 5000 4.51 4.50
8 5000 9.01 8.98
16 5000 17.62 17.58
32 5000 35.05 35.03
64 5000 69.48 68.30
128 5000 133.97 133.95
256 5000 206.10 205.86
512 5000 576.27 573.69
1024 5000 1035.02 1034.46
2048 5000 1207.47 1206.42
4096 5000 1336.65 1336.36
8192 5000 1407.50 1407.48
16384 5000 1453.84 1453.76
32768 5000 1482.45 1482.44
65536 5000 1495.00 1494.99
131072 5000 1501.55 1501.51 //MAX値
262144 5000 1471.14 1471.13
524288 5000 1468.67 1468.55
1048576 5000 1469.21 1468.62
2097152 5000 1468.69 1468.66
4194304 5000 1471.43 1471.43
8388608 5000 1471.54 1471.53
------------------------------------------------------------------
LinuxでSRPに接続する
そろそろ文字の羅列に(主に自分が)疲れてきたところですが、まだ続きます。2回に分けるべきだったかもしれませんがそれほどの内容でもないのでまとめてしまいます。
LinuxでSRPイニシエーターを使うには、OFEDスタックを入れるか、srptoolsをDLしてきます。イニシエーター側は特にカーネルを作り直す必要はありません。
http://www.openfabrics.org/downloads/srptools/
多分、Debianならいつも通りconfigure --prefix=/usr/ --mandir=/usr/share/man/manでcheckinstall -Dで通ると思います。よく覚えてないです。
どうにかしてsrptoolsが入ったら、 srp_daemonを実行します。なお、srp_daemonを実行するにはib_umadドライバがロードされている必要があります。また、SRPを使うのでib_srpもロードする必要があります。
一度Windowsから接続できている状態であれば、srp_daemon -a -oしたときに何かしらの文字が帰ってくると思います。srp_daemonの詳しい引数はここやman srp_daemonでみれますが、-a -oは全てのターゲットを一回だけスキャンする、と言う引数です。
root@ib0:~# modprobe ib_umad
root@ib0:~# modprobe ib_srp
root@ib0:~# srp_daemon -a -o
10/11/12 19:39:51 : Class Port Info set returned status 0x000c
10/11/12 19:39:51 : Warning: set of ClassPortInfo failed
IO Unit Info:
port LID: 0001
port GID: fe800000000000000005ad00000bf4d5
change ID: 0001
max controllers: 0x10
controller[ 1]
GUID: 0005ad00000bf4d4
vendor ID: 000005
device ID: 006274
IO class : 0100
ID: SCST SRP target
service entries: 1
service[ 0]: 0005ad00000bf4d4 / SRP.T10:0005ad00000bf4d4
何も帰ってこない場合はターゲットが動いていないので、ターゲット側でtailf /var/log/systemして、***WARNING***等の文字列をみて、それっぽいエラーを見つけてください。だんだん適当になってきてるのは多分気のせいです。
上のような文字が帰ってきたら、/sys/class/infiniband_srp/srp-<device>-<port>/add_target file に書き込みます。今回はmthca0のポート1がイニシエーターに使うポートなので、そこにリダイレクトします。
root@ib0:~# srp_daemon -c -o > /sys/class/infiniband_srp/srp-mthca0-1/add_target
10/11/12 19:39:24 : Class Port Info set returned status 0x000c
10/11/12 19:39:24 : Warning: set of ClassPortInfo failed
このコマンドを発行したタイミングで、イニシエーターがSCSTターゲットに接続するので、Windowsの時と同じ要領でdmesgかtailf /var/log/messageしてイニシエーターIDを調べます。
Dec 10 19:39:27 ibhack kernel: [ 4609.618429] ib_srpt: Received SRP_LOGIN_REQ with i_port_id 0x0:0x5ad00000bf3d0, t_port_id 0x5ad00000bf4d4:0x5ad00000bf4d4 and it_iu_len 260 on port 1 (guid=0xfe80000000000000:0x5ad00000bf4d5)
Dec 10 19:39:27 ibhack kernel: [ 4609.619471] scst: Using security group "ib_srpt_target_0" for initiator これ→"0x00000000000000000005ad00000bf3d0" (target ib_srpt_target_0)
イニシエーターIDが判明したら、ターゲット側でadd_initで追加します。
root@ibhack:~# scstadmin -add_init 0x00000000000000000005ad00000bf3d0 -driver ib_srpt -target ib_srpt_target_0 -group ibhack_srp
Collecting current configuration: done.
-> Making requested changes.
-> Adding new initiator '0x00000000000000000005ad00000bf3d0' to driver/target/group 'ib_srpt/ib_srpt_target_0/ibhack_srp': done.
-> Driver/target is not a fibre channel target, ignoring.
-> Done.
All done.
Initiatorを追加したら、一度ib_srpをアンロードし、もう一度ロードし、またSRP接続します。
root@ib0:~# rmmod ib_srp
root@ib0:~# modprobe ib_srp
root@ib0:~# srp_daemon -c -o > /sys/class/infiniband_srp/srp-mthca0-1/add_target
イニシエーター側でdmesg等をして接続できたか確認します。
Dec 10 20:05:10 ib0 kernel: [ 3054.245465] scsi9 : SRP.T10:0005AD00000BF4D4
Dec 10 20:05:10 ib0 kernel: [ 3054.245936] scsi 9:0:0:0: Direct-Access SCST_BIO ram 220 PQ: 0 ANSI: 5
Dec 10 20:05:10 ib0 kernel: [ 3054.246132] sd 9:0:0:0: Attached scsi generic sg1 type 0
Dec 10 20:05:10 ib0 kernel: [ 3054.246262] sd 9:0:0:0: [sdb] 20971520 512-byte logical blocks: (10.7 GB/10.0 GiB)
Dec 10 20:05:10 ib0 kernel: [ 3054.246267] sd 9:0:0:0: [sdb] 4096-byte physical blocks
Dec 10 20:05:10 ib0 kernel: [ 3054.246783] sd 9:0:0:0: [sdb] Write Protect is off
Dec 10 20:05:10 ib0 kernel: [ 3054.247088] sd 9:0:0:0: [sdb] Write cache: enabled, read cache: enabled, doesn't support DPO or FUA
Dec 10 20:05:10 ib0 kernel: [ 3054.248428] sdb: unknown partition table
Dec 10 20:05:10 ib0 kernel: [ 3054.249145] sd 9:0:0:0: [sdb] Attached SCSI disk
これで無事にブロックデバイスとして見れました。簡単なベンチです。
シーケンシャル読み込み
root@ib0:~# dd if=/dev/sdb of=/dev/null bs=1M
10240+0 records in
10240+0 records out
10737418240 bytes (11 GB) copied, 9.41218 s, 1.1 GB/s
シーケンシャル書き
root@ib0:~# dd of=/dev/sdb if=/dev/zero bs=1M
dd: writing `/dev/sdb': No space left on device
10241+0 records in
10240+0 records out
10737418240 bytes (11 GB) copied, 9.24043 s, 1.2 GB/s
大体Windows7と同じ値が出ました。bonnie++とかFIOとかしんどいので今度します。
SCSTの設定の保存とサービス登録
驚いたことにまだ続きます。今回はramfsで構築してしまったので再起動したらどのみち消えてしまうのですが、その設定で問題なければ設定を保存します。保存せず再起動するとtargetの設定は消えます。(ネットワーク機器を設定したあとwrite memoryを忘れてやってしまうあれのように
scstadmin -write_config /etc/scst.conf
また、デフォルトではscstサービスは起動時に立ち上がらないので、起動時にscstが立ち上がるようにします。(もしかしたら最初から立ち上がってたかも?要再検証
update-rc.d scst defaults
次回起動時にscstのドライバにib_srptも使うように/etc/default/scstを編集します。
SCST_TARGET_MODULES="scst_local iscsi_scst ib_srpt"
ここのコメントアウトを外し、有効化します。
Debian/squeeze以降での/dev/ramについて
http://d.hatena.ne.jp/n314/20100324/1269429930
こちらに書いてあるように、brdモジュールをロードすると/dev/ramが作れます。/etc/modulesに
brd rd_nr=1 rd_size=10485760
と書いて、
scstadmin -open_dev ram -handler vdisk_blockio -attributes filename=/dev/ram0
とscstadminをしておけば、再起動の度にramfsを作ってddして…としなくてすみます。毎度メモリを10G持っていかれますが。まあ、困ったときにはrmmod brdすればデータ丸ごと破棄してメモリが解放されます。
LIOについて
今回、SCSTの対比としてLIOもやってみようかと思ったのですが、対応ハードウェアがConnect X2以降と書いてあり、対応ハードウェアを持っていない為試していません。
following Mellanox InfiniBand HCAs are supported:
Mellanox ConnectX-2 VPI PCIe Gen2 HCAs (x8 lanes), single/dual-port QDR 40 Gb/s
Mellanox ConnectX-3 VPI PCIe Gen3 HCAs (x8 lanes), single/dual-port FDR 56 Gb/s
Mellanox ConnectX-IB PCIe Gen3 HCAs (x16 lanes), single/dual-port FDR 56 Gb/s
The InfiniBand/SRP fabric module (srpt.ko, Linux kernel driver database) for the Unified Target was released with Linux kernel 3.3 on March 18, 2012.[1]
http://www.linux-iscsi.org/wiki/SRP#Hardware_support
個人用メモ
modprobe brd rd_nr=1 rd_size=10485760
modprobe ib_srpt
modprobe scst
modprobe scst_vdisk
scstadmin -open_dev ram -handler vdisk_blockio -attributes filename=/dev/ram0
scstadmin -add_group ibhack_srp -driver ib_srpt -target ib_srpt_target_0
scstadmin -add_lun 0 -driver ib_srpt -target ib_srpt_target_0 -group ibhack_srp -device ram -attributes read_only=0
scstadmin -enable_target ib_srpt_target_0 -driver ib_srpt
scstadmin -add_init (InitiatorID) -driver ib_srpt -target ib_srpt_target_0 -group ibhack_srp
scstadmin -write_config /etc/scst.conf
所感
やはり、RDMAは速いです。最初は何をすればいいか全く分かりませんでしたが、何をすれば良いのかが分かれば大して難しくないです。しかし、scstを入れるのが若干めんどくさいというかmake&&make installで済んでくれないかなと思います。
何だかんだでまとめるのに1日かかってしまいました…文の推敲は後日します。
参考
素晴らしいHowto(というか、ほぼここの和訳に近いという
http://davidhunt.ie/wp/?p=2291
ツイート
コメントを書く
必要事項とコメントを入力して下さい。