MegaRAIDでR5なディスクをR6に拡張する方法のメモです。Megacliは適当にrpmを入手してばらしてDebian上で使ってます。
まずディスク3本で組まれたRAID5を6本に拡張し、その際にRAID6にするという手順です。個人のメモなのでこの通りにやってうまく行かなかったとしてもデータロストなどの一切の責任は取りません。
MegaCliの引数に-がついたりついていなかったりはHelpからコピペしたり手て打ったりしているので起きていますが、引数の前の「-」はあってもなくても動きます。
こちらも参照:
LSIのRAID管理あれこれ
確認環境
# lsb_release -a
No LSB modules are available.
Distributor ID: Debian
Description:    Debian GNU/Linux 9.3 (stretch)
Release:        9.3

# MegaCli -v


      MegaCLI SAS RAID Management Tool  Ver 8.07.10 May 28, 2013

    (c)Copyright 2013, LSI Corporation, All Rights Reserved.

Exit Code: 0x00
# lspci|grep Mega
01:00.0 RAID bus controller: LSI Logic / Symbios Logic MegaRAID SAS 2208 [Thunderbolt] (rev 01)
#みんな大好きN8103-150です

# MegaCli -AdpAllInfo -a0

Adapter #0

==============================================================================
                    Versions
                ================
Product Name    : LSI MegaRAID SAS 9267-8i
Serial No       : ****
FW Package Build: 23.1.1-0024
設定手順
RAID5ディスク作成
以下のコマンドでまずRAID5の論理ディスクを作成します。
MegaCli -cfgldadd -r5[15:0,15:1,15:2] wb ra direct cachedbadbbu -a0
その後、ディスクが正常に認識されていることを確認します。
root@debian:~# MegaCli ldinfo lall aall


Adapter 0 -- Virtual Drive Information:
Virtual Drive: 0 (Target Id: 0)
Name                :
RAID Level          : Primary-5, Secondary-0, RAID Level Qualifier-3
Size                : 3.637 TB
Sector Size         : 512
Parity Size         : 1.818 TB
State               : Optimal
Strip Size          : 64 KB
Number Of Drives    : 3
Span Depth          : 1
Default Cache Policy: WriteBack, ReadAhead, Direct, Write Cache OK if Bad BBU
Current Cache Policy: WriteBack, ReadAhead, Direct, Write Cache OK if Bad BBU
Default Access Policy: Read/Write
Current Access Policy: Read/Write
Disk Cache Policy   : Enabled
Encryption Type     : None
Default Power Savings Policy: Controller Defined
Current Power Savings Policy: None
Can spin up in 1 minute: Yes
LD has drives that support T10 power conditions: No
LD's IO profile supports MAX power savings with cached writes: No
Bad Blocks Exist: No
Is VD Cached: No


~~~
root@debian:~# Megacli ldpdinfo a0|grep -E "^(Raw|Enclosure Device ID|Slot)"
Enclosure Device ID: 15
Slot Number: 0
Raw Size: 1.819 TB [0xe8e088b0 Sectors]
Enclosure Device ID: 15
Slot Number: 1
Raw Size: 1.819 TB [0xe8e088b0 Sectors]
Enclosure Device ID: 15
Slot Number: 2
Raw Size: 1.819 TB [0xe8e088b0 Sectors]
#構成されているディスクが3本であることを確認する
ディスクの物理追加
その後、ドライブを物理ドライブに追加(ホット/コールドどちらでも)して、正しくドライブが認識できていることを確認します。
root@debian:~# MegaCli pdlist aall |grep -E "^(Raw|Enclosure Device ID|Slot)"
Enclosure Device ID: 15
Slot Number: 0
Raw Size: 1.819 TB [0xe8e088b0 Sectors]
Enclosure Device ID: 15
Slot Number: 1
Raw Size: 1.819 TB [0xe8e088b0 Sectors]
Enclosure Device ID: 15
Slot Number: 2
Raw Size: 1.819 TB [0xe8e088b0 Sectors]
Enclosure Device ID: 15
Slot Number: 3
Raw Size: 1.819 TB [0xe8e088b0 Sectors]
Enclosure Device ID: 15
Slot Number: 4
Raw Size: 1.819 TB [0xe8e088b0 Sectors]
Enclosure Device ID: 15
Slot Number: 5
Raw Size: 1.819 TB [0xe8e088b0 Sectors]
#合計6本のディスクが認識されていることを確認する。Enclosure Device IDは機種やRAIDカードによって変わります。
ReconstructRateを変更する
サーバのレスポンスより再構築を優先したい場合(サーバが使いものにならないほど遅くなってもいいから早く終わらせたい場合)はReconRateを変更します。多分、再構築中に変更しても、反映は次回のマイグレーション時、もしくは再起動後の反映になっている気がします(要確認)
#確認
root@debian:~# MegaCli -AdpGetProp ReconRate -a0

Adapter 0: Reconstruction Rate = 30%

Exit Code: 0x00
#再構築レートを80%にする
root@debian:~# MegaCli -AdpsetProp ReconRate 80 -a0

Adapter 0: Set Reconstruction Rate to 80% success.
RAID5 から RAID6 へマイグレーション
ディスクのエンクロージャIDとスロットナンバーを確認したら、Reconstruction(再構築)を始めます。今回はエンクロージャIDが15固定、既存ドライブのスロットが0,1,2で構成されているので、そこに3,4,5を追加します。再構築を始めるとコントローラのレスポンスが悪くなりますがそういうものです。
root@debian:~# MegaCli -LDRecon -Start -r6 Add PhysDrv[15:3,15:4,15:5] -L0 -a0

Start Reconstruction of Virtual Drive Success.

Exit Code: 0x00
進捗確認方法
再構築の進捗はLDrecon showprog、もしくはldinfoで確認できます。
root@debian:~# MegaCli -LDRecon showprog -l0 -a0

Reconstruction on VD #0 (target id #0) Completed 1% in 51 Minutes.

Exit Code: 0x00

root@debian:~# MegaCli ldinfo lall aall


Adapter 0 -- Virtual Drive Information:
Virtual Drive: 0 (Target Id: 0)
Name                :
RAID Level          : Primary-5, Secondary-0, RAID Level Qualifier-3
Size                : 3.637 TB
Sector Size         : 512
Parity Size         : 1.818 TB
State               : Optimal
Strip Size          : 64 KB
Number Of Drives    : 3
Span Depth          : 1
Default Cache Policy: WriteBack, ReadAhead, Direct, Write Cache OK if Bad BBU
Current Cache Policy: WriteThrough, ReadAheadNone, Cached, Write Cache OK if Bad BBU
Default Access Policy: Read/Write
Current Access Policy: Read/Write
Disk Cache Policy   : Enabled
Ongoing Progresses:
  Reconstruction           : Completed 1%, Taken 51 min.   <============これ
Encryption Type     : None
Default Power Savings Policy: Controller Defined
Current Power Savings Policy: None
Can spin up in 1 minute: Yes
LD has drives that support T10 power conditions: No
LD's IO profile supports MAX power savings with cached writes: No
Bad Blocks Exist: No
Is VD Cached: No


Exit Code: 0x00
ずっと進捗を見たい場合はprogdsplyで確認できます。見ていて終わるような時間の長さではありませんが。ESCで終了します。
root@debian:~# MegaCli -LDRecon -ProgDsply -l0 -a0

 Progress of Virtual Drives...

  Virtual Drive #              Percent Complete                       Time Elps
          0         ***********************01 %*********************** 00:52:08

    Press <ESC> key to quit...
サーバを止めなくてもオンラインで移行できますが、再構築中は非常にレスポンスが遅いので終わるまでサーバの使用を避けたほうがいいです。
ちなみにReconRate80時の再構築中の読み取り速度は3本構成→6本移行時で1MB/s程度まで落ちました。
root@debian:~# dd if=/dev/sdb of=/dev/null bs=1M count=100
^C76+0 records in
75+0 records out
78643200 bytes (79 MB, 75 MiB) copied, 52.602 s, 1.5 MB/s
NASとしてのレスポンスも目に見えて遅くなります。
また、時間が1000分を超えると何故か3桁しか表示されません。
root@debian:~# MegaCli -LDRecon showprog -l0 -a0

Reconstruction on VD #0 (target id #0) Completed 31% in 907 Minutes.

Exit Code: 0x00
root@debian:~# MegaCli -LDRecon showprog -l0 -a0

Reconstruction on VD #0 (target id #0) Completed 49% in 294 Minutes. #おそらく1294分

Exit Code: 0x00
気になってstorcliでも見てみましたが、こちらは残り時間を表示するようです。全く当てになりませんが…
root@debian:~/storcli/Unified_storcli_all_os/Linux/opt/MegaRAID/storcli# ./storcli /c0 /v0 show migrate
CLI Version = 007.0409.0000.0000 Nov 06, 2017
Operating system = Linux4.9.0-4-amd64
Controller = 0
Status = Success
Description = None


VD Operation Status :
===================

-------------------------------------------------------
VD Operation Progress% Status      Estimated Time Left
-------------------------------------------------------
 0 Migrate          50 In progress 5 Hours 30 Minutes
-------------------------------------------------------
ディスク容量拡張
再構築が終わったら、rescanを実行してディスクサイズ拡張をOSに通知します。再構築が無事に終わってから初めてディスクサイズが拡張されます。
また、再構築が終わってから更にBGI( Background Initialization、整合性チェック)が走るので、本来のパフォーマンスが出るようになるのはさらにあとになります。この途中でデータが消えることはありません。
まずはldinfoなどで容量が拡張されたことを確認します。
root@debian:~# MegaCli ldinfo lall aall


Adapter 0 -- Virtual Drive Information:
Virtual Drive: 0 (Target Id: 0)
Name                :
RAID Level          : Primary-6, Secondary-0, RAID Level Qualifier-3
Size                : 7.275 TB <================これ
Sector Size         : 512
Parity Size         : 3.637 TB
State               : Optimal
Strip Size          : 64 KB
Number Of Drives    : 6
Span Depth          : 1
Default Cache Policy: WriteBack, ReadAhead, Direct, Write Cache OK if Bad BBU
Current Cache Policy: WriteBack, ReadAhead, Direct, Write Cache OK if Bad BBU
Default Access Policy: Read/Write
Current Access Policy: Read/Write
Disk Cache Policy   : Enabled
Ongoing Progresses:
  Background Initialization: Completed 51%, Taken 125 min.
Encryption Type     : None
Default Power Savings Policy: Controller Defined
Current Power Savings Policy: None
Can spin up in 1 minute: Yes
LD has drives that support T10 power conditions: No
LD's IO profile supports MAX power savings with cached writes: No
Bad Blocks Exist: No
Is VD Cached: No


Exit Code: 0x00
その後、OSに容量が拡張されたことを通知します。
root@debian:~# fdisk -l /dev/sdb
Disk /dev/sdb: 3.7 TiB, 3999688294400 bytes, 7811891200 sectors
Units: sectors of 1 * 512 = 512 bytes
Sector size (logical/physical): 512 bytes / 512 bytes
I/O size (minimum/optimal): 512 bytes / 512 bytes
#古い容量のまま

root@debian:~# echo 1 > /sys/block/sdb/device/rescan
#リスキャンさせる

root@debian:~# fdisk -l /dev/sdb
Disk /dev/sdb: 7.3 TiB, 7999376588800 bytes, 15623782400 sectors
Units: sectors of 1 * 512 = 512 bytes
Sector size (logical/physical): 512 bytes / 512 bytes
I/O size (minimum/optimal): 512 bytes / 512 bytes
#容量が拡張された
OSの認識容量が拡張されたら、ファイルシステムのリサイズを行います。今回はxfsを使っているので、xfs_growfsを使います。
root@debian:~# df -h
Filesystem      Size  Used Avail Use% Mounted on
udev             32G     0   32G   0% /dev
tmpfs           6.3G  9.7M  6.3G   1% /run
/dev/sda1       7.1G  1.2G  5.6G  18% /
tmpfs            32G     0   32G   0% /dev/shm
tmpfs           5.0M     0  5.0M   0% /run/lock
tmpfs            32G     0   32G   0% /sys/fs/cgroup
tmpfs           6.3G     0  6.3G   0% /run/user/1000
/dev/sdb        3.7T  205G  3.5T   6% /mnt  <================これ

root@debian:~# xfs_growfs /dev/sdb
meta-data=/dev/sdb               isize=512    agcount=4, agsize=244121600 blks
         =                       sectsz=512   attr=2, projid32bit=1
         =                       crc=1        finobt=1 spinodes=0 rmapbt=0
         =                       reflink=0
data     =                       bsize=4096   blocks=976486400, imaxpct=5
         =                       sunit=0      swidth=0 blks
naming   =version 2              bsize=4096   ascii-ci=0 ftype=1
log      =internal               bsize=4096   blocks=476800, version=2
         =                       sectsz=512   sunit=0 blks, lazy-count=1
realtime =none                   extsz=4096   blocks=0, rtextents=0
data blocks changed from 976486400 to 1952972800

root@debian:~# df -h
Filesystem      Size  Used Avail Use% Mounted on
udev             32G     0   32G   0% /dev
tmpfs           6.3G  9.7M  6.3G   1% /run
/dev/sda1       7.1G  1.2G  5.6G  18% /
tmpfs            32G     0   32G   0% /dev/shm
tmpfs           5.0M     0  5.0M   0% /run/lock
tmpfs            32G     0   32G   0% /sys/fs/cgroup
tmpfs           6.3G     0  6.3G   0% /run/user/1000
/dev/sdb        7.3T  209G  7.1T   3% /mnt <================これ
これでマイグレーションが終わりました。
以上
ESXiでもWindowsでもMegaCliを使う限りは同じです。また、2TB*3のRAID5を2TB*6のRAID6へ移行するには50時間近くかかりました。
マイグレーションできるレベルについては以下です。
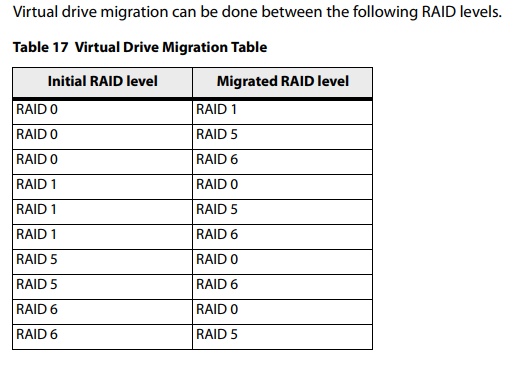
マイグレーションした結果が大きいサイズ→小さいサイズ(例:4本のRAID5をそのままRAID6に移行する)という移行をした場合、どうなるかは未確認です。(そもそもできるのか?)
Related articles
0 コメント